August 27, 2018
Measuring while well protected against dust and fluids
Special length gauges and evaluation electronics from HEIDENHAIN for in-process measurement.

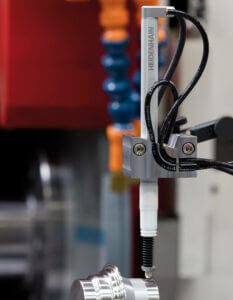
Saves time and costs with in-process measurements in harsh environmental conditions: the new HEIDENHAIN-SPECTO ST 3087 RC length gauge
In-process measurement plays an increasingly important role in quality control because component inspection directly in the machine or at least close to production in the workshop is exceedingly precise while saving time and money. For these applications, HEIDENHAIN offers reliable measurement components with high degrees of protection up to IP67.
Particularly for applications under harsh ambient conditions, e.g., in metal-cutting production areas, HEIDENHAIN has developed the new ST 3087 RC SPECTO length gauge. It features special protection for the measuring technology, which permits measuring operations directly in the production process. This saves time and money through significantly reduced time, cost and transportation. HEIDENHAIN’s ACANTO length gauges are suitable for automated inspection equipment and multipoint measuring stations. When combined with MSE 1000 evaluation electronics, these HEIDENHAIN solutions meet the highly specific demands of many metrological tasks.
SPECTO ST 3087 RC: measuring in the work envelope
The new ST 3087 RC HEIDENHAIN-SPECTO gauge increases productivity and efficiency particularly in those applications where, for reasons of time or accuracy, it is not possible to clamp the workpiece on a separate device to inspect the machining process. Instead, the length gauge integrates the highly accurate measuring process directly into the production process.
This SPECTO gauge has a special housing for in-process measurements. In the plunger rest position, it holds the plunger and a rubber bellows enclosing the plunger. In this rest position, a splash guard cap also closes the exit opening for the plunger in the housing. For a measurement, which normally takes place when the cooling lubrication is switched off, the plunger in the bellows moves out of the housing through the application of compressed air and is well protected during measurement.
The optical scanning provides high-accurate position values with a maximum error of ±1 μm over a 30 mm measuring range. Thanks to its stroke of 30 mm and its high accuracy over its entire measuring range, it can measure diverse components from the same fixture. In addition, the photoelectric scanning together with the ball guide permits consistent repeatability when scanning oblique surfaces. The cycle time for measurements is below 1.5 s.
ACANTO: measuring absolutely and reliably

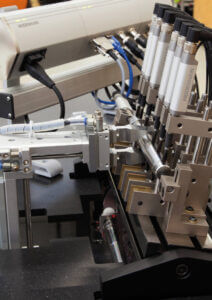
Solutions for multi-station measuring stations from HEIDENHAIN: absolute ACANTO length gauges with a station width of only 15 mm and the MSE 1000 for up to 250 measuring channels
The AT 1218 length gauge with 12 mm measuring range and AT 3018 with 30 mm measuring range from the HEIDENHAIN-ACANTO series utilize absolute scanning, which calculates position values from a code-based pattern on a substrate. This rules out any measuring errors from excessive plunger velocity from bouncing or strong vibrations such as can occur with incremental encoders during very dynamic measuring tasks, like on a test stand next to a production machine. The HEIDENHAIN-ACANTO length gauge ascertains the absolute position value with a maximum error of ±1 µm in the version with 12 mm measuring range, and ±2 µm for 30 mm.

Automatically captures digital and analog measurands: the flexible evaluation electronics MSE 1000
The EnDat 2.2 bidirectional interface used here makes an important contribution to reliable measurement. Over this interface, HEIDENHAIN-ACANTO length gauges can transmit analyzable information on measurements and provide data on the quality of each individual machining or quality testing step. The subsequent electronics can use this information to independently configure the signal period or measuring step. Also, the EnDat 2.2 interface enables information to be written back to the length gauge. This provides immediate benefits to quality assurance and machine maintenance. With the aid of this diagnostic information, the user can determine the quality of the measurement and, thanks to the valuation numbers, prevent unnecessary standstills in production.
The ACANTO length gauges are particularly well suited for multipoint inspection apparatuses, especially in combination with the HEIDENHAIN modular subsequent electronics MSE 1000 or an EnDat-enabled PLC.
MSE 1000: the modular evaluation electronics for multipoint inspection apparatuses
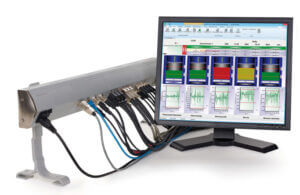
HEIDENHAIN offers the MSE 1000 to ensure that data from multipoint measuring stations can be evaluated reliably and quickly. It enables the simultaneous measurement of up to 250 measurement channels over a wide variety of interfaces. During the conception of the MSE 1000, HEIDENHAIN placed great value on making the installation and connection of multiple measuring devices as simple as possible. Modules can be mounted to DIN top-hat rails to form tidy and compact measuring stations. Special connections and the housing design of the individual modules enable up to IP65 protection. The module chain can automatically detect which modules are in use once connected. The user is only required to define and configure the individual channels.

The MSE 1000 directly provides diagnostic data for the connected measuring and testing devices: EnDat valuation numbers (left), warnings and alarms (center) or Lissajous figures (right)
The MSE 1000 allows EnDat encoders to be connected and automatically configured with their entire functionality, enabling all the benefits of EnDat instantly. Measured values, warnings, alarms and the ID number can be displayed and queried via the MSE 1000. In addition to the EnDat protocol for absolute encoders, the MSE1000 also supports incremental interfaces such as 1Vpp and 11uA. Additional connection options for analog sensors and LVDT and HBT displacement sensors from well-known producers are also available.
The MSE1000 also includes a setup software, MSESetup, along with a DLL library for application integration. This enables more sophisticated measuring applications and data handling, while keeping the initial configuration simple.

