Quality assurance made easy during production processes
Rigid quality demands, highly sensitive workpieces and materials, and regular quality checks during running production are the requirements of modern, high-tech manufacturing. Moreover, this applies to both relatively young industries such as medical and energy technology as well as the more traditional sectors such as automotive construction and precision engineering. HEIDENHAIN now offers two custom-designed solutions for these requirements—the METRO Zero Force length gauge and the modular MSE 1000 subsequent electronics.
Precision is the be all and end all in modern production, and continuous compliance with this is an art in itself. Manufacturing companies invest in finest measuring technology to achieve this, implemented on so-called measuring islands in the immediate vicinity of their production plant. Parts from running production are continuously tested here as an integral part of the process chain, ascertaining their compliance to stringent quality standards and precision specifications.

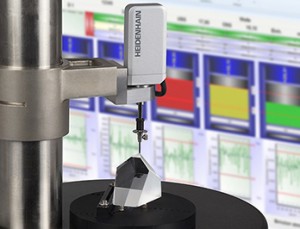
Figure 1: The METRO Zero Force from HEIDENHAIN—the new way to measure delicate workpieces with very high precision, and almost without exertion of measuring forces.
Testing of the finished components is often insufficient, because the process is not for selecting rejects or parts for reworking, but is aimed at optimizing and adjusting running production processes to ensure that waste or reworking does not occur. For example, high-precision layer structures require layer thickness inspection after each production step, and grinding processes with µ-precision surfaces must be tested simultaneously during machining.
Highly diverse tasks and problems exist with measuring processes on the measuring islands. One problem, for example, is the deformation of delicate or elastic test components due to tactile encoders. Standard encoders supply the required levels of precision, but may cause measurement errors or damage to workpieces if high measuring forces are applied. A further task is the capture of data on the measuring islands—several measuring stations continuously output values that often need to be simultaneously measured, independently of the various encoder interfaces. A third challenge is to ensure that everything functions correctly on the measuring island, which can also be though of as quality assurance for the quality assurance.
HEIDENHAIN provides intelligent solutions for all three requirements. The compact, manually actuated METRO Zero Force length gauge enables filigree workpieces to be measured with extremely high precision, and with almost no deformation. For this purpose the device combines maximum system precision and repeatability with measuring technology almost free of pressure forces on the test component. The modular MSE 1000 subsequent electronics is able to simultaneously capture up to 250 measuring channels with a high diversity of interfaces, and features extensive online diagnosis functions that supply data for the purposes of anticipatory quality assurance and error reduction during production runs. In addition, a DLL program library for Windows operating systems enables operators of the MSE 1000 to write their own testing programs for specific applications.
METRO Zero Force: The lightness of measuring
Continuous progress in material technology, leading for example to the increased use of flexible materials such as elastomers in the industrial sector, as well as a trend towards smaller production runs, present new challenges for measuring delicate workpieces. The undesired deformation of elastic parts caused by the encoder may distort measurement results, and workpieces made of highly sensitive materials can also damage or destroy the encoder. Destruction-free, non-tactile measuring principles are common, but the inherent challenge here is to provide high levels of precision. Processes based on optical measurement are not able to match the precision of tactile encoders with photoelectric scanning, and transparent materials often cause problems with optical methods because measurement in such cases is costly in time and effort.
The new Zero Force length gauge from HEIDENHAIN’s METRO range (Fig. 1) now enables a test object to be measured tactilely with minimum risk from deformation or damage. This is due to the unusually low measuring force of between 0.01 N and 0.07 N manifested by the length gauge over its complete 12 mm measuring path. In addition to the low development of measuring forces, the METRO Zero Force also features Zerodur precision graduation with 2 µm signal periods. Zerodur has a thermal coefficient of expansion of almost 0 ppm/K in the 0 °C to 100 °C range, meaning that ambient temperature has no influence on expansion of the scale—the true length is always measured. Zerodur is also used as mirror substrate material in astronomical large-scale telescopes due to such outstanding thermal characteristics.
In addition to scanning, highly precise ball bearing guides are a further core component of the METRO Zero Force, and the interplay of ball bearing guides and high-precision photoelectric scanning achieves repeatability of less than 0.03 µm along the complete measuring path. The system precision of the length gauge is ±0.2 µm, also providing benchmark values in terms of this performance feature. METRO Zero Force enables HEIDENHAIN to access new fields in the tactile, high-precision metrology sector, for example with the measurement of gear wheels with minimum dimensions, medical technology products and highly diverse types of glasses and wafers. Test objects in such applications would have previously been destroyed under normal gauging pressures.

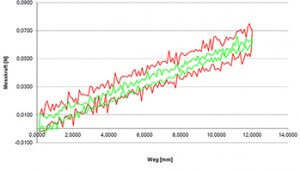
Figure 2: Measuring forces with the HEIDENHAIN METRO Zero Force, with approach and retraction in supply state (red) and after 5 million cycles (green).
Figure 2 shows the measuring force curve with the HEIDENHAIN METRO Zero Force during approach and retraction. The x-axis represents the measurement path, and the y-axis the force exerted by the plunger. The red color displays the force in the state of delivery, and green the force after five million measurement cycles—an enormous lifespan for a manually actuated encoder. The graph clearly shows that the measurement forces curve even improves across the five million measurement cycles, due to running-in of the bearings, developed and produced in-house by HEIDENHAIN.
MSE 1000: Mastering multipoint measuring stations
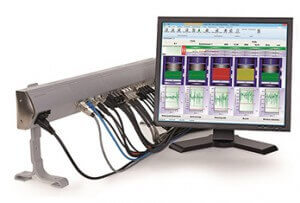
Multipoint measuring stations are becoming ever more important in the field of industrial measuring technology. Electronics control the simultaneous measurement of several measured values on a test component in such applications, and often as part of a predetermined testing procedure with complex measuring tasks. The launching of the modular MSE 1000 subsequent electronics now makes it possible to simultaneously measure up to 250 measurement channels over a wide variety of interfaces (Fig. 3).

Figure 3: With the MSE 1000, HEIDENHAIN provides flexible evaluation electronics for the capture of digital and analog measurement quantities with up to 250 measuring channels.
When designing the MSE 1000, HEIDENHAIN placed an emphasis on simplicity for installation of the modules and connection to the encoder. The selected system configuration of the modules is detected completely automatically and unnoticed by the user, who only needs to define and set the specific measuring channels.
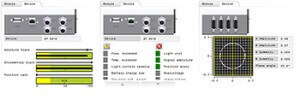
When using EnDat encoders, configuring the encoder is not necessary—it independently provides all data required for operation and is immediately ready for measuring. The MSE 1000 also of course enables EnDat encoders to be connected in their entire functionality, and this gives users decisive advantages in terms of the predictive maintenance of their measuring systems. The functional reserve of absolute and incremental tracks can also be depicted for example due to the online diagnosis functionality of EnDat devices. Users can also access other operational criteria such as illumination condition, signal amplitude and position value calculation, which in turn improves availability and operation reliability of the system (Fig. 4).
In addition to support for the EnDat HEIDENHAIN protocol for absolute encoders, all common incremental encoders, further connection options for analog sensors and LVDT and HBT displacement sensors from well-known producers are also supported. Modules with switching inputs and outputs enable interaction with other actuators in the encoder.
With the MSE 1000, HEIDENHAIN provides the following modules:
- Axis modules with interfaces for linear and angle encoders (1 VPP, TTL/RS-485, EnDat 2.2, LVDT, HBT)
- Axis module with universal interface for various sensors (± 10 V, 4 to 20 mA)
- Compressed air switching module for direct control of e.g. pneumatically actuated length gauges
- I/O module for digital inputs and outputs
- Power supply modules (100 to 240 V AC, 24 V DC)

Figure 4: The MSE 1000 outputs diagnosis data directly to connected encoders and inspection devices: EnDat evaluation figures (left), warnings and alarms (center), and Lissajous figures (right).
Modules can be mounted to DIN rails to achieve tidy and compact measuring stations, with data transmission via standard Ethernet.
A DLL program library is included in the MSE 1000 scope of supply. This represents the range of features of the MSE 1000 on the software side and enables operators to develop their own testing programs. With testing processes requiring further actions (depending on measuring results), further inputs and outputs can also be switched. This programming capability of the MSE 1000 partly eliminates the need for additional control equipment.
METRO Zero Force, MSE 1000 and Q-DAS procella: The ideal team
On modern measuring islands, evaluating a measurement means more than just collecting information on-site—if measurements are to be transformed into results they have to be processed, analyzed and then archived. The interplay between Q-DAS and HEIDENHAIN enables this in a particularly simple and convenient way, with successful software solutions supporting the high-precision metrology. The current version 11 of procella implements the software-based integration of the MSE 1000 into the Q-DAS world. This combined solution provides the complete functionality of the procella software, and also significantly simplifies the management of complex measuring stations for users. All channels can be parameterized for example in procella, and also for the new METRO Zero Force length gauge. HEIDENHAIN measuring technology and Q-DAS software collect, process, evaluate and archive information, and handling is both simple and convenient thanks to the complete integration of hardware and software. As a result, document obligation is also aided in many cases, as existing extensively for example in the medical technology sector.

